本文目录
PowerShell性能优化系列文章
- PowerShell优化和性能测试
- 让你的PowerShell For循环提速四倍
- 优化PowerShell的性能和内存消耗
- PowerShell提速和多线程
- 优化PowerShell脚本的几个小技巧
- 轻量级的PowerShell性能测试
本篇文章本是源自PowerShell.Com上的一个教程视频,讲师为Dr. Tobias Weltner。有时间的朋友可以直接去看英文视频。我英文水平有限,还没到达单靠纯听力就能给视频加中文字幕的能力,所以就把原视频中的观点与例子分享出来。
概述
我们平时写脚本时,经常会提醒自己要多使用管道,要多使用流模式,少占内存,少占CPU。但是这篇文章会反其道而行之,少用管道,通过内存和CPU的占用来提高效率,也就是我们通常算法上说的用空间来换取时间。机器配置高,有的用,而不用就是浪费。
比如下面的场景:
- 写一个大文件可能需要3.6分钟,提高性能后,只需3秒钟。
- 读一个大文件可能需要77秒钟,提高性能后,只需2秒钟。
- 检查250台机器的是否在线,需要23.2分钟,提高性能后,只需26秒钟。

PowerShell性能提高前后对比图
这一切性能的提升都是有偿的,需要你额外的投资。
投资更多内存
在PowerShell中推崇的管道主要是为了限制内存的使用量,让管道中的元素像流水线中的零件或者半成品一样,从车间一个一个穿过。但是管道并不是最快的,且看下面的随机数的例子。
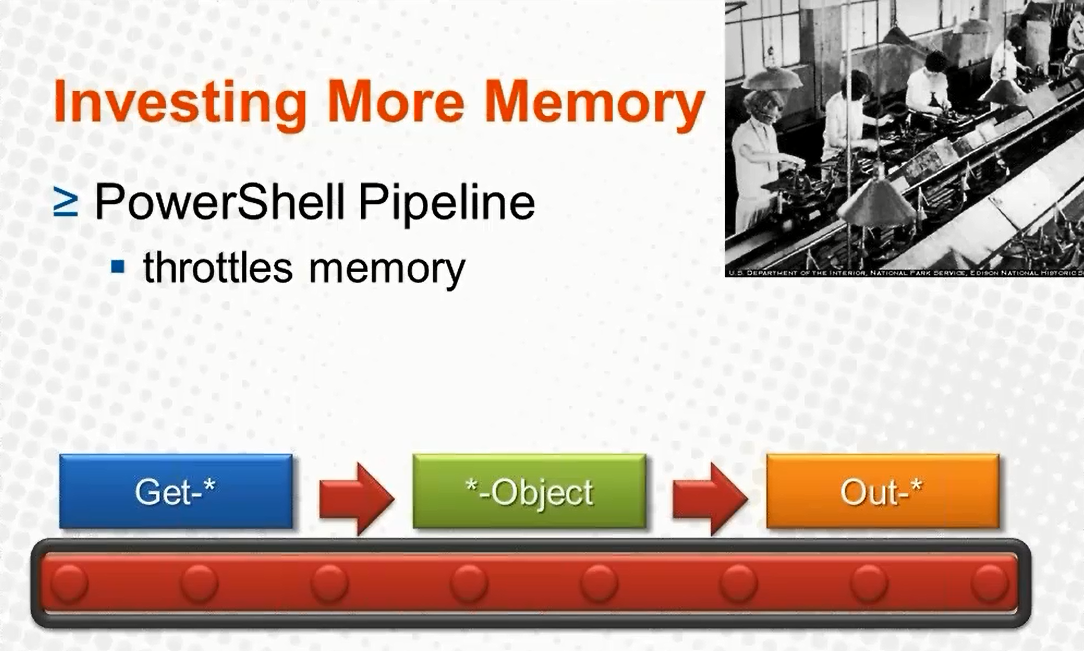
管道流模式可以节省内存
随机数的例子
#这个很快
PS> 1..100 |Get-Random
90

#这个稍有延迟,可以容忍
PS> 1..10000 |Get-Random
4868

#这个慢的受不了,所以直接Ctrl-C取消。
PS> 1..1000000 |Get-Random
是不是就意味着1000000这么大的一个数组Get-Random天生就这么慢,非也。换个方法:
#这样做,快的一塌糊涂啊
PS> Get-Random -InputObject (1..1000000)
317486
原因是前者使用了管道,产生一条数据,流过一条数据。而后者是直接一次性产生全部数据,然后交给Get-Random,所以快。
写文件的例子
$all = @('Some Test' * 20)*1000000
$file = "$Env:TEMP\testfile.txt"
$all | Out-File $file
上面的脚本执行大概需要215 秒钟(3.6分钟)
换个方式,使用inputObject,仅用了101秒钟(1.8分钟)
Out-File $file -InputObject $all
是不是优化就止于此了呢,不,下面的结果会亮瞎我的眼睛啊,只需要2.5秒钟。
[Io.file]::WriteAllLines( $file, $all,[text.encoding]::Unicode)
真真没想到直接调用.NET方法差别会这么大,但是我用的是PowerShell,你给我整.NET方法,用键盘敲起来未免坑爹啊,那就试试Set-Content吧,只需要3.1秒钟。
Set-Content $file -Value $all -Encoding Unicode
与WriteAllLine相比,稍慢,也可以忍受。
通过这个写文件的例子对比不难发现,3.6分钟/3.1秒钟=70,,速度几乎提高了70倍啊。
总结一下,写文件时注意两点即可:
- 不要使用管道。
- 不要使用神马的Out-这样的命令(因为它会做格式化)
读文件的例子
对于我们刚才创建的文本文件,一般读取时,我们习惯使用Get-Content,需要77秒钟(1.3分钟)
Get-Content $file
而如果使用.NET方法,只需1.8秒钟。
[io.file]::ReadAllLines($file)
Get-Content为什么会这么慢,因为它要一行一行来读,并把读取的数据存储成数组,所以慢。但是Get-Content有一个参数ReadCount,把值设为0,一次性全部读取,只需2.2秒钟。
Get-Content $file -ReadCount 0
把文件读出来一般是需要处理的,如果这样肯定不是你预期的,因为只会输出一个X:
Get-Content $file -ReadCount 0 | foreach {"X" }
这样就对了,只需要2.7秒钟。
$text = Get-Content $file -ReadCount 0
foreach ($line in $text) {'X'}
千万不要多次一举,引入管道,得68秒钟啊:
$text = Get-Content $file -ReadCount 0 | foreach {"X" }
$text | ForEach-Object {'X'}
警告
- cmdlet明显非常慢
- .NET一些底层的方法相对较快
解药
- 不要轻易引入管道。
- 尽量使用传统的For或者foreach循环
如果你还不相信,请继续看例子。
多用循环,少用管道的例子
1..1000000 | ForEach-Object { "looping for the $_ Time"}
上面使用管道,执行时间为6.9秒钟。如果换成简单的For循环,只需要0.5秒钟,速度提高了14倍。
For ( $x=1; $x -le 100000;$x++)
{
  "Looping for the $x. time"
}
再看一个抑制输出的例子,三个写法效果一样,速度相差几十倍。
#耗时0.1毫秒
'Hello' |out-null

#耗时 0.002毫秒,速度提高了56倍
$null= 'Hello'

#耗时0.0025毫秒,速度也很快
[void] 'Hello'
投资更多CPU
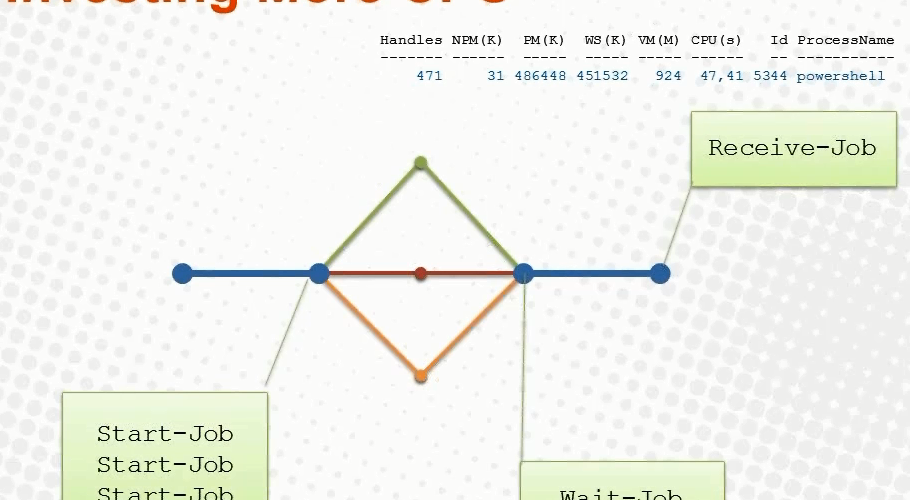
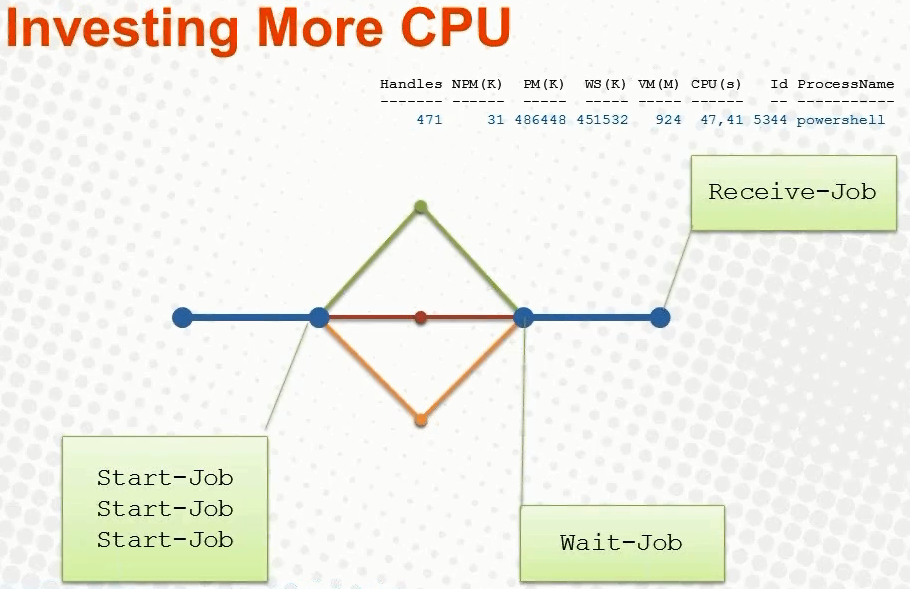
PowerShell默认是单线程的执行的,只能一行命令接着一行命令来执行。我们可以使用PowerShell的后台Job来提高效率:对于批量任务,启用多个后台任务去处理,使用wait-job等待所有的任务结束。
多个后台任务批处理
先看一个顺序执行的例子。
$start = Get-Date
$code1 = { Start-Sleep -Seconds 5; 'A' }
$code2 = { Start-Sleep -Seconds 6; 'B'}
$code3 = { Start-Sleep -Seconds 7; 'C'}

$result1,$result2,$result3= (& $code1),(& $code2),(& $code3)

$end =Get-Date
$timespan= $end - $start
$seconds = $timespan.TotalSeconds

Write-Host "总耗时 $seconds 秒."
Write-Host "三个脚本块总共延时 18 秒"
输出为(耗时18秒钟):
总耗时 18.0240865 秒.
三个脚本块总共延时 18 秒
同样的任务,使用后台Job多线程执行:
$start = Get-Date
$code1 = { Start-Sleep -Seconds 5; 'A' }
$code2 = { Start-Sleep -Seconds 6; 'B'}
$code3 = { Start-Sleep -Seconds 7; 'C'}

$job1 = Start-Job -ScriptBlock $code1
$job2 = Start-Job -ScriptBlock $code2
$job3 = Start-Job -ScriptBlock $code3

$alljobs =  Wait-Job $job1,$job2,$job3
$result1,$result2,$result3 = Receive-Job $alljobs

$end =Get-Date

$timespan= $end - $start
$seconds = $timespan.TotalSeconds
Write-Host "总耗时 $seconds 秒."
Write-Host "三个脚本块总共延时 18 秒"
输出为(耗时10秒钟):
总耗时 10.3778469 秒.
三个脚本块总共延时 18 秒
效率提升很明显。
使用后台Job的开销
- 每一个新的任务执行时都会使用一个新PowerShell进程。(所以所谓的多线程并不是真正的多线程,而是工作在进程级别上)
- 每一个任务的结果需要序列化后,跨进程传递给调度的主进程。
- 没有节流机制(所以要注意控制后台Job的数量)。
计算后台Job的开销
使用这段示例脚本:
# (C) 2012 Dr. Tobias Weltner
# you may freely use this code for commercial or non-commercial purposes at your own risk
# as long as you credit its original author and keep this comment block.
# For PowerShell training or PowerShell support, feel free to contact tobias.weltner@email.de

$code = {
  $begin = Get-Date
  $result = Get-Process
  $end = Get-Date

  $begin
  $end
  # play here by reducing the returned data,
  # i.e. use select-object to pick specific properties:
  $result
}

$start = Get-Date

$job = Start-Job -ScriptBlock $code
$null = Wait-Job $job
$completed = Get-Date

$result = Receive-Job $job
$received = Get-Date

$spinup = $result[0]
$exit = $result[1]

$timeToLaunch = ($spinup - $start).TotalMilliseconds
$timeToExit = ($completed - $exit).TotalMilliseconds
$timeToRunCommand = ($exit - $spinup).TotalMilliseconds
$timeToReceive = ($received - $completed).TotalMilliseconds

'{0,-30} : {1,10:#,##0.00} ms' -f 'Time to set up background job', $timeToLaunch
'{0,-30} : {1,10:#,##0.00} ms' -f 'Time to run code', $timeToRunCommand
'{0,-30} : {1,10:#,##0.00} ms' -f 'Time to exit background job', $timeToExit
'{0,-30} : {1,10:#,##0.00} ms' -f 'Time to receive results', $timeToReceive
脚本会在后台的Job的启动,运行,结束和接受数据每个阶段设置时间戳,然后计算各个阶段耗费的时间。
第一次运行时,输出结果为:
Time to set up background job  :     270.01 ms
Time to run code               :      10.00 ms
Time to exit background job    :   1,550.06 ms
Time to receive results        :      10.00 ms
主要的延迟在Job退出时,因为上面的Job返回了大量的数据,假如我们注释掉上面示例代码的第15行,再执行一遍:
Time to set up background job  :     350.01 ms
Time to run code               :      10.00 ms
Time to exit background job    :      10.00 ms
Time to receive results        :       0.00 ms
执行效率明显提高,但是绝大多数的后台Job应当都会返回数据的,哪怕返回一点,所以我们把上面脚本的第15改成这样,再执行一遍:
$result | select-object Name,CPU
Time to set up background job  :     420.02 ms
Time to run code               :      10.00 ms
Time to exit background job    :     100.01 ms
Time to receive results        :       0.00 ms
稍有延迟,可以忍受。
结论
通过这个例子主要是告诉大家,影响后台任务的关键因素是返回的数据量,如果没有特别的需求,尽量在后台Job中不返回数据,或者少返回数据。
从进程间迁移到进程内
正如后台Job为用户所诟病的那样,它不是真正的多线程,而是多进程。所以下面我们开始从进程间迁移到进程内,使用实至名归的PowerShell多线程,因为它会在PowerShel.exe内部创建一个新的线程。
使用进程内多线程的优点
- 不需要新的宿主进程
- 不需要序列化结果
- 线程内通信方便
- 运行空间池提供了自动内存节流
开启一个线程
先看一个简单的在PowerShell中开启一个同步线程的例子
PS>  # Running New Thread Synchronously:
PS> $code = { Start-Sleep -Seconds 2; "Hello" }
PS> $newPowerShell = [PowerShell]::Create().AddScript($code)
PS> $newPowerShell.Invoke()
Hello
让线程异步运行
稍加改动,使用BeginInvoke()异步执行,使用EndInvoke()返回线程的数据:
$code = {Start-Sleep -Seconds 2; "Hello"}

$newPowerShell = [PowerShell]::Create().AddScript($code)
$handle = $newPowerShell.BeginInvoke()

while ($handle.IsCompleted -eq $false) {
  Write-Host '.' -NoNewline
  Start-Sleep -Milliseconds 500
}

Write-Host ''
$newPowerShell.EndInvoke($handle)
输出示例,先有原点的进度条
PS>
.....
Hello
演示一个进度提示器
function Start-Progress {
  param(
    [ScriptBlock]
    $code
  )

  $newPowerShell = [PowerShell]::Create().AddScript($code)
  $handle = $newPowerShell.BeginInvoke()

  while ($handle.IsCompleted -eq $false) {
    Write-Host '.' -NoNewline
    Start-Sleep -Milliseconds 500
  }

  Write-Host ''

  $newPowerShell.EndInvoke($handle)

  $newPowerShell.Runspace.Close()
  $newPowerShell.Dispose()
}
记得要在运行空间使用结束后,调用Close和Dispose方法释放资源。
先显示进度信息,然后返回结果。
PS> Start-Progress -code {Get-HotFix}
..

Source        Description      HotFixID      InstalledBy          InstalledOn
------        -----------      --------      -----------          -----------
ETS-V-TEST-01 Update           KB2899189_... NT AUTHORITY\SYSTEM  5/14/2014 12:00:00 AM
ETS-V-TEST-01 Update           KB2919355     ETS-V-TEST-01\Adm... 3/18/2014 12:00:00 AM
ETS-V-TEST-01 Update           KB2919442     ETS-V-TEST-01\Adm... 3/18/2014 12:00:00 AM
ETS-V-TEST-01 Security Update  KB2920189     NT AUTHORITY\SYSTEM  5/14/2014 12:00:00 AM
ETS-V-TEST-01 Security Update  KB2926765     NT AUTHORITY\SYSTEM  5/15/2014 12:00:00 AM
ETS-V-TEST-01 Security Update  KB2931366     NT AUTHORITY\SYSTEM  5/14/2014 12:00:00 AM
这个执行起来太快了,换一个慢一点的命令,效果更明显。
PS> Start-Progress -code {Get-WmiObject -Class Win32_product}
................................................
IdentifyingNumber : {90150000-0015-0409-0000-0000000FF1CE}
Name              : Microsoft Access MUI (English) 2013
Vendor            : Microsoft Corporation
Version           : 15.0.4569.1506
Caption           : Microsoft Access MUI (English) 2013

IdentifyingNumber : {90150000-0115-0409-0000-0000000FF1CE}
Name              : Microsoft Office Shared Setup Metadata MUI (English) 2013
Vendor            : Microsoft Corporation
Version           : 15.0.4569.1506
Caption           : Microsoft Office Shared Setup Metadata MUI (English) 2013
演示定时炸弹
function Start-Timebomb {
  param(
    [Int32]
    $Seconds,

    [ScriptBlock]
    $Action = { Stop-Process -Id $PID }
  )

  $Wait = "Start-Sleep -seconds $seconds"
  $script:newPowerShell = [PowerShell]::Create().AddScript($Wait).AddScript($Action)
  $handle = $newPowerShell.BeginInvoke()
  Write-Warning "Timebomb is active and will go off in $Seconds seconds unless you call Stop-Timebomb before."
}

function Stop-Timebomb {
  if ( $script:newPowerShell -ne $null) {
    Write-Host 'Trying to stop timebomb...' -NoNewline
    $script:newPowerShell.Stop()
    $script:newPowerShell.Runspace.Close()
    $script:newPowerShell.Dispose()
    Remove-Variable newPowerShell -Scope script
    Write-Host 'Done!'
  } else {
    Write-Warning 'No timebomb found.'
  }
}
在控制台上开启了定时炸弹后,如果没有及时停止,倒计时结束后,控制台会自动关闭。
PS> Start-Timebomb -Seconds 10
WARNING: Timebomb is active and will go off in 10 seconds unless you call Stop-Timebomb before.
监控脚本的执行时间
如果你想让倒计时的信息显示在控制台的标题栏,只需要修改上面的脚本第10行,修改成:
$Wait = "1..$seconds | foreach-object {start-sleep -seconds 1; [console]::Title=""`$($Seconds-`$_) seconds remaining`"}"
监控脚本的运行内存
如果一个脚本运行时,占用的内存超过了限制,就自动终结掉这个进程。
function Start-TimebombMemory {
  param(
    [Int32]
    $MemoryMB=30,

    [ScriptBlock]
    $Action = { Stop-Process -Id $PID }
  )

  $Wait = '
    $initial = (Get-Process -Id $PID).WorkingSet
    $threshold = (XXX * 1MB)
    do  {
      $memory = ((Get-Process -Id $PID).WorkingSet - $initial)
      Start-Sleep -Seconds 1
      [system.Console]::Title = ("Current Memory Load: {0:0.00} MB. Threshold: XXX MB" -f ($memory/1MB))
    } while ($memory -lt $threshold)

    $message1 = "Shell is using {0:0.0} MB which is exceeding the threshold by {1:0.0} MB." -f ($memory/1MB), (($memory-$threshold)/1MB)
    $message2 = "Shell will be aborted in 5 seconds. There is nothing you can do about it, sorry."
    [System.Console]::WriteLine($message1)
    [System.Console]::WriteLine($message2)
    Start-Sleep -Seconds 5
    ' -replace 'XXX', $MemoryMB

  $script:newPowerShellMB = [PowerShell]::Create().AddScript($Wait).AddScript($Action)
  $handle = $newPowerShellMB.BeginInvoke()
  Write-Warning "Timebomb is active and will go off when the shell uses more than $memoryMB MB -  unless you call Stop-Timebomb before."
}

function Stop-TimebombMemory {
  if ( $script:newPowerShellMB -ne $null) {
    Write-Host 'Trying to stop timebomb...' -NoNewline
    $script:newPowerShellMB.Stop()
    $script:newPowerShellMB.Runspace.Close()
    $script:newPowerShellMB.Dispose()
    Remove-Variable newPowerShellMB -Scope script
    Write-Host 'Done!'
  } else {
    Write-Warning 'No timebomb found.'
  }
}
执行了Start-TimebombMemory后,会在PowerShell的控制台动态显示当前PowerShell进程占用的内存和阈值,如果内存占用超标,打印信息提示用户,并在5秒钟后自动关闭当前进程。
动态监控脚本的运行内存
创建一个STA模式的线程
你写了一个函数,调用winform的OpenFileDialog来打开文件选择对话框。很不幸如果当前的控制台运行在MTA模式下,则对话框不能显示。所以为了增强兼容性,给你的函数单独指定一个线程运行,因为在运行空间中可以指定Apartment State。具体看下面的代码:
function Show-OpenFileDialog {
	param(
	[string]$Title='Select a file',
	[string]$Path=$home,
	[string]$Filter = "All Files (*.*)|*.*"
	)


	$code = {
		param(
		[string]$Title,
		[string]$Path,
		[string]$Filter = "All Files (*.*)|*.*"
		)

		Add-Type -AssemblyName System.Windows.Forms

		$DialogOpen = New-Object System.Windows.Forms.OpenFileDialog
		$DialogOpen.InitialDirectory = $Path
		$DialogOpen.Filter = $Filter
		$DialogOpen.Title = $Title
		$Result = $DialogOpen.ShowDialog()
		if ($Result -eq "OK")
		{
			$DialogOpen.FileName
		}
	}

	$newRunspace = [RunSpaceFactory]::CreateRunspace()
	$newRunspace.ApartmentState = 'MTA'
	$newRunspace.Open()
	$newPowerShell = [PowerShell]::Create()
	$newPowerShell.Runspace = $newRunspace
	[void]$newPowerShell.AddScript($code).AddArgument($Title).AddArgument($Path).AddArgument($Filter)
	$newPowerShell.Invoke()
	$newPowerShell.Runspace.Close()
	$newPowerShell.Dispose()
}
多线程中的关键组件
- PowerShell:代表线程
- RunSpace:代表Powershell会话
- BeginInvoke():返回等待的句柄
- EndInvoke():返回结果对象
- MTA和STA模式可以完全控制
- 每次执行完毕后,记得释放RunSpace,销毁线程。
启用节流
- 创建一个RunSpace 池
- 使用RunSpace池代替Runspace
- 在池中控制活动的RunSpace个数
演示简单的运行空间池
限定活动的线程最多为5,这样当尝试开启40个线程时,并不是一下子开启,而是排队等候空闲的线程池,每次最多只能有5个活动的线程池。
$throttleLimit = 5
$iss = [system.management.automation.runspaces.initialsessionstate]::CreateDefault()
$Pool = [runspacefactory]::CreateRunspacePool(1, $throttleLimit, $iss, $Host)
$Pool.Open()

$ScriptBlock = {
	param($id)
	Start-Sleep -Seconds 2
	[System.Console]::WriteLine("Done processing ID $id")
}

for ($x = 1; $x -le 40; $x++) {
	$powershell = [powershell]::Create().AddScript($ScriptBlock).AddArgument($x)
	$powershell.RunspacePool = $Pool
	$handle = $powershell.BeginInvoke()
}
从多线程中接受数据
$throttleLimit = 4
$SessionState = [system.management.automation.runspaces.initialsessionstate]::CreateDefault()
$Pool = [runspacefactory]::CreateRunspacePool(1, $throttleLimit, $SessionState, $Host)
$Pool.Open()

$ScriptBlock = {
	param($id)

	Start-Sleep -Seconds 2
	"Done processing ID $id"
}

$threads = @()

$handles = for ($x = 1; $x -le 40; $x++) {
	$powershell = [powershell]::Create().AddScript($ScriptBlock).AddArgument($x)
	$powershell.RunspacePool = $Pool
	$powershell.BeginInvoke()
  $threads += $powershell
}

do {
  $i = 0
  $done = $true
  foreach ($handle in $handles) {
    if ($handle -ne $null) {
  	  if ($handle.IsCompleted) {
        $threads[$i].EndInvoke($handle)
        $threads[$i].Dispose()
        $handles[$i] = $null
      } else {
        $done = $false
      }
    }
    $i++
  }
  if (-not $done) { Start-Sleep -Milliseconds 500 }
} until ($done)
声明:本文所有观点,图片,示例脚本引用自 Dr. Tobias Weltner的视频教程。感谢 Dr. Tobias Weltner!
示例脚本出处:demofiles_multithreading
视频出处:Speeding Up PowerShell (网盘:密码: 7w21 )
请尊重原作者和编辑的辛勤劳动,欢迎转载,并注明出处!
广播: PowerShell优化和性能测试 | PowerShell 中文博客
广播: 让你的PowerShell For循环提速四倍 | PowerShell 中文博客
大赞!
非常棒,这篇文章今年看,依然让我受益匪浅
谢谢,非常有用
很有用哦!
PS C:\Users\******> $all = (‘Some Test’ * 5)*3
PS C:\Users\******> $all
Some TestSome TestSome TestSome TestSome TestSome TestSome TestSome TestSome TestSome TestSome TestSome TestSome TestSome TestSome Test
PS C:\Users\******> $all = @(‘Some Test’ * 5)*3
PS C:\Users\******> $all
Some TestSome TestSome TestSome TestSome Test
Some TestSome TestSome TestSome TestSome Test
Some TestSome TestSome TestSome TestSome Test
↑原来带不带@效果是不一样的
Get-Content $file -ReadCount 0
这里面的 “-ReadCount 0” 并不好使,还是按行读的,跟没有这个parameter是一样的。