本文目录
前言
本文以Azure的官方文档《在 Azure 中的 SUSE Linux Enterprise Server 上设置 Pacemaker》和《设置高度可用的 NFS 服务器》为基础,演示如何在Windows Azure上基于SBD配置高可用NFS服务器。
此SBD非彼SBD。本文中的SBD指的是集群中的Stonith Block Device,而不是Shared Block Device。因此在一个SAP NetWeaver系统中,配置ASCS高可用时所依赖的共享存储NFS服务器仍旧是必须的。SBD在里面仅仅扮演了一个Fence 代理。
免责声明:生产环境中部署时,请以最新的官方文档为主,本文仅为个人操作步骤记录,不做为配置文档。
机器准备
本次演示用到下表中的三台机器,其中nfs01和nfs02在同一个可用性集中,通过负载均衡器提供外部访问入口。
- NFS01:192.168.1.10。(节点1)
- NFS02:192.168.1.20。(节点2)
- SBDVM:192.168.1.100。SBD的目标服务器
安装过程
为了和官方文档保持一致,以下标题前【1】代表需要在节点1上配置,【2】代表需要在节点2配置,【A】代表需要在两个节点上都配置。
设置 iSCSI 目标服务器
部署一台新的 SLES 12
我使用的是SLES-For-SAP-12-SP2(BYOS)镜像,所以启动后还需要使用注册码激活:
sbdvm:~ # SUSEConnect --url=https://scc.suse.com -e sap####@pstips.net -r 激活码
Registered SLES_SAP 12.2 x86_64
To server: https://scc.suse.com
Using E-Mail: sap####@pstips.net
更新 SLES
sbdvm:~ # sudo zypper update
Refreshing service 'SMT-http_smt-azure_susecloud_net'.
Refreshing service 'cloud_update'.
Loading repository data...
Reading installed packages...
安装 iSCSI 目标包
sbdvm:~ # sudo zypper install targetcli-fb dbus-1-python
Refreshing service 'Public_Cloud_Module_12_x86_64'.
Refreshing service 'SUSE_Linux_Enterprise_Server_for_SAP_Applications_12_SP2_x86_64'.
Loading repository data...
Reading installed packages...
'dbus-1-python' is already installed.
No update candidate for 'dbus-1-python-1.2.0-4.194.x86_64'. The highest available version is already installed.
Resolving package dependencies...
启用 iSCSI 目标服务
sbdvm:~ # sudo systemctl enable target
Created symlink from /etc/systemd/system/sysinit.target.wants/target.service to /usr/lib/systemd/system/target.service.

sbdvm:~ # sudo systemctl enable targetcli
Created symlink from /etc/systemd/system/remote-fs.target.wants/targetcli.service to /usr/lib/systemd/system/targetcli.service.

sbdvm:~ # sudo systemctl start target

sbdvm:~ # sudo systemctl start targetcli
在 iSCSI 目标服务器上创建 iSCSI 设备
执行这一步之前,请确保已经给sbdvm增加了一台数据磁盘,1GB即可。
sbdvm:~ # sudo ls -al /dev/disk/azure/scsi1/
total 0
drwxr-xr-x 2 root root  60 Apr 12 07:26 .
drwxr-xr-x 3 root root 160 Apr 12 07:27 ..
lrwxrwxrwx 1 root root  12 Apr 12 07:26 lun0 -> ../../../sdc

sbdvm:~ # sudo ls -l /dev/disk/by-id/scsi-* | grep sdc
lrwxrwxrwx 1 root root  9 Apr 12 07:26 /dev/disk/by-id/scsi-14d534654202020201350f2ef1194d24fa4fb7d8a7c9345e3 -> ../../sdc

sbdvm:~ # sudo targetcli backstores/block create nfs1 /dev/disk/by-id/scsi-14d534654202020201350f2ef1194d24fa4fb7d8a7c9345e3
Created block storage object nfs1 using /dev/disk/by-id/scsi-14d534654202020201350f2ef1194d24fa4fb7d8a7c9345e3.

sbdvm:~ # sudo targetcli iscsi/ create iqn.2006-04.nfs1.local:nfs1
Created target iqn.2006-04.nfs1.local:nfs1.
Created TPG 1.
Global pref auto_add_default_portal=true
Created default portal listening on all IPs (0.0.0.0), port 3260.

sbdvm:~ # sudo targetcli iscsi/iqn.2006-04.nfs1.local:nfs1/tpg1/luns/ create /backstores/block/nfs1
Created LUN 0.

sbdvm:~ # sudo targetcli iscsi/iqn.2006-04.nfs1.local:nfs1/tpg1/acls/ create iqn.2006-04.nfs01.local:nfs01
Created Node ACL for iqn.2006-04.nfs01.local:nfs01
Created mapped LUN 0.

sbdvm:~ # sudo targetcli iscsi/iqn.2006-04.nfs1.local:nfs1/tpg1/acls/ create iqn.2006-04.nfs02.local:nfs02
Created Node ACL for iqn.2006-04.nfs02.local:nfs02
Created mapped LUN 0.

sbdvm:~ # sudo targetcli saveconfig
Last 10 configs saved in /etc/target/backup.
Configuration saved to /etc/target/saveconfig.json
sbdvm:~ # sudo systemctl restart target
设置 SBD 设备
[A] 连接到 iSCSI 设备
nfs01:~ # sudo systemctl enable iscsid
Created symlink from /etc/systemd/system/multi-user.target.wants/iscsid.service to /usr/lib/systemd/system/iscsid.service.
nfs01:~ # sudo systemctl enable iscsi
nfs01:~ # sudo systemctl enable sbd
Created symlink from /etc/systemd/system/pacemaker.service.requires/sbd.service to /usr/lib/systemd/system/sbd.service.
[1] 在第一个节点上更改发起程序名称
nfs01:~ # sudo vi /etc/iscsi/initiatorname.iscsi
#Change the content of the file to match the ACLs you used when creating the iSCSI device on the iSCSI target server
InitiatorName=iqn.2006-04.nfs01.local:nfs01
[2] 在第二个节点上更改发起程序名称
nfs02:~ # sudo vi /etc/iscsi/initiatorname.iscsi
#Change the content of the file to match the ACLs you used when creating the iSCSI device on the iSCSI target server
InitiatorName=iqn.2006-04.nfs02.local:nfs02
[A] 重新启动 iSCSI 服务
nfs01:~ # sudo systemctl restart iscsid
nfs01:~ # sudo systemctl restart iscsi

nfs01:~ # sudo iscsiadm -m discovery --type=st --portal=192.168.1.100:3260
192.168.1.100:3260,1 iqn.2006-04.nfs1.local:nfs1

nfs01:~ # sudo iscsiadm -m node -T iqn.2006-04.nfs1.local:nfs1 --login --portal=192.168.1.100:3260
Logging in to [iface: default, target: iqn.2006-04.nfs1.local:nfs1, portal: 192.168.1.100,3260] (multiple)
Login to [iface: default, target: iqn.2006-04.nfs1.local:nfs1, portal: 192.168.1.100,3260] successful.

nfs01:~ # sudo iscsiadm -m node -p 192.168.1.100:3260 --op=update --name=node.startup --value=automatic
nfs01:~ #

nfs01:~ #  lsscsi
[1:0:0:0]    disk    Msft     Virtual Disk     1.0   /dev/sda
[3:0:1:0]    disk    Msft     Virtual Disk     1.0   /dev/sdb
[5:0:0:0]    disk    Msft     Virtual Disk     1.0   /dev/sdc
[6:0:0:0]    disk    LIO-ORG  nfs1             4.0   /dev/sdd


nfs01:~ # ls -l /dev/disk/by-id/scsi-* | grep sdd
lrwxrwxrwx 1 root root  9 Apr 12 08:31 /dev/disk/by-id/scsi-1LIO-ORG_nfs1:6722c588-08d9-4638-b025-af3422e9464d -> ../../sdd
lrwxrwxrwx 1 root root  9 Apr 12 08:31 /dev/disk/by-id/scsi-360014056722c58808d94638b025af342 -> ../../sdd
lrwxrwxrwx 1 root root  9 Apr 12 08:31 /dev/disk/by-id/scsi-SLIO-ORG_nfs1_6722c588-08d9-4638-b025-af3422e9464d -> ../../sdd
[1] 创建 SBD 设备
nfs01:~ # sudo sbd -d /dev/disk/by-id/scsi-360014056722c58808d94638b025af342 -1 10 -4 20 create
Initializing device /dev/disk/by-id/scsi-360014056722c58808d94638b025af342
Creating version 2.1 header on device 4 (uuid: 90cca9d5-22aa-41ab-8272-e8615e6c537c)
Initializing 255 slots on device 4
Device /dev/disk/by-id/scsi-360014056722c58808d94638b025af342 is initialized.
[A] 调整 SBD 配置
nfs01:~ # sudo vi /etc/sysconfig/sbd

SBD_DEVICE="/dev/disk/by-id/scsi-360014056722c58808d94638b025af342"

## Type: yesno
## Default: yes
#
# Whether to enable the pacemaker integration.
#
SBD_PACEMAKER="yes"

## Type: list(always,clean)
## Default: always
#
# Specify the start mode for sbd. Setting this to "clean" will only
# allow sbd to start if it was not previously fenced. See the -S option
# in the man page.
#
SBD_STARTMODE="always"

nfs01:~ # echo softdog | sudo tee /etc/modules-load.d/softdog.conf
softdog

nfs01:~ # sudo modprobe -v softdog
insmod /lib/modules/4.4.59-92.17-default/kernel/drivers/watchdog/softdog.ko
集群安装
[A] 更新 SLES
nfs01:~ # sudo zypper update
Refreshing service 'Public_Cloud_Module_12_x86_64'.
Refreshing service 'SUSE_Linux_Enterprise_Server_for_SAP_Applications_12_SP2_x86_64'.
Loading repository data...
Reading installed packages...

Nothing to do.
[1] 启用 SSH 访问
nfs01:~ # sudo ssh-keygen
Generating public/private rsa key pair.
Enter file in which to save the key (/root/.ssh/id_rsa):
Created directory '/root/.ssh'.
Enter passphrase (empty for no passphrase):
Enter same passphrase again:
Your identification has been saved in /root/.ssh/id_rsa.
Your public key has been saved in /root/.ssh/id_rsa.pub.
The key fingerprint is:
SHA256:+GzmCC1OjTdxOKkIptvRptP1QAWku3yr+lpjTVYxQ/o root@nfs01
The key's randomart image is:
+---[RSA 2048]----+
|     .oo=        |
|     . ..+       |
|    . ...        |
|     ..*         |
|..  ..O E        |
|o. + Xo*         |
|. o.#.Bo=        |
| o.O.* B.        |
|. ==+.o .        |
+----[SHA256]-----+

nfs01:~ # sudo cat /root/.ssh/id_rsa.pub
ssh-rsa AAAAB3NzaC1yc2EAAAADAQABAAABAQDUOH3+VRSomdzrGi3mjw+q5VnV+ymeim0B8IA/8Xprk/5IuIVMAX004OMiqQbR0j41W9zWUWhoIubx/PQIB1xv7V9YmltngwmrummY79lHG4vkUSwwURFy/GJxzJ1Ro8QGb8+8tSf/t/um5dzq/1XYHHaDpriNPTt5cUQRG+pVzQUshvv7SYc/Dax1h0pSZ91auzi58kjENUC1s0i/osgnkt4Ya9S1QK/QTrR6JtqOVuZuU5Cc5tbjHXcVPiJWjwl5udYevQlAw9QhPPIInmCOeMn9wR7aUtr0g4az+Dmt5LkrOfcLDFpKwgBil/8YG23GXnvF/tSv6xcL2SbE2z/F root@nfs01
[2] 启用 SSH 访问
nfs02:~ # sudo ssh-keygen
Generating public/private rsa key pair.
Enter file in which to save the key (/root/.ssh/id_rsa):
Created directory '/root/.ssh'.
Enter passphrase (empty for no passphrase):
Enter same passphrase again:
Your identification has been saved in /root/.ssh/id_rsa.
Your public key has been saved in /root/.ssh/id_rsa.pub.
The key fingerprint is:
SHA256:WjArvQ9BvulDbHgqyDDPqpbZXxGv1bpxF7elN8MjFs4 root@nfs02
The key's randomart image is:
+---[RSA 2048]----+
|                 |
|                 |
|      +.         |
|     + +o .      |
|    .o=.So . o ..|
|o   ..=B+ . o =.o|
|o=+  =*o o . E.*.|
|.=+...oo  + o ..+|
|=. .......       |
+----[SHA256]-----+

nfs02:~ # sudo vi /root/.ssh/authorized_keys
#复制nfs01的公钥至此

nfs02:~ # sudo cat /root/.ssh/id_rsa.pub
ssh-rsa AAAAB3NzaC1yc2EAAAADAQABAAABAQC7evJTH8uftBHwBv/l0psYYajUq1DjpsRCkdSKzx2MxbXslGE1Vup1ygjPFmIApiJZOhScYXi6R60FRJVQk9K23ln7MmsrB21f5TX+b+wk6Fyy4G9DucXvqai7awN/4vKBX49PgBEs332V9qXj3w1j56EO9nELU5NibKrvTd5f295MmLp30sPB38hHmQqtQtb8QWSr8AcwlsWZBnNwu9nzUWuXSV8S5RjoICUV4u48e8cPT2wooASSff1XLdPSbUwLS2YppcvdfukpgzevHH5wEiUsQK8280J5gE9qVxzlShrOpfjqMrDpbyedWQo5qMZjpER1B4RuCp4fTxFG+2Lj root@nfs02
[1] 启用 SSH 访问
nfs01:~ # sudo vi /root/.ssh/authorized_keys
#复制nfs02的公钥至此
[A] 设置主机名称解析
nfs01:~ # sudo vi /etc/hosts

# IP address of the first cluster node
192.168.1.10 nfs01
# IP address of the second cluster node
192.168.1.20 nfs02
[A] 安装 HA 扩展
nfs01:~ # sudo zypper install sle-ha-release fence-agents
Refreshing service 'Public_Cloud_Module_12_x86_64'.
Refreshing service 'SUSE_Linux_Enterprise_Server_for_SAP_Applications_12_SP2_x86_64'.
Loading repository data...
Reading installed packages...
'fence-agents' is already installed.
No update candidate for 'fence-agents-4.0.22+git.1455008135.15c5e92-9.4.3.x86_64'. The highest available version is already installed.
Resolving package dependencies...
[1] 安装群集
nfs01:~ # sudo ha-cluster-init
WARNING: NTP is not configured to start at system boot.
  Do you want to continue anyway? [y/N] y
  Enabling sshd.service
  /root/.ssh/id_rsa already exists - overwrite? [y/N] N
  Configuring csync2
  Generating csync2 shared key (this may take a while)...done
  Enabling csync2.socket
  csync2 checking files

Configure Corosync:
  This will configure the cluster messaging layer.  You will need
  to specify a network address over which to communicate (default
  is eth0's network, but you can use the network address of any
  active interface), a multicast address and multicast port.

  Network address to bind to (e.g.: 192.168.1.0) [192.168.1.0][回车]
  Multicast address (e.g.: 239.x.x.x) [239.196.38.197][回车]
  Multicast port [5405]

Configure SBD:
  If you have shared storage, for example a SAN or iSCSI target,
  you can use it avoid split-brain scenarios by configuring SBD.
  This requires a 1 MB partition, accessible to all nodes in the
  cluster.  The device path must be persistent and consistent
  across all nodes in the cluster, so /dev/disk/by-id/* devices
  are a good choice.  Note that all data on the partition you
  specify here will be destroyed.

  SBD is already configured - overwrite? [y/N] N
  Enabling hawk.service
    HA Web Konsole is now running, to see cluster status go to:
      https://192.168.1.10:7630/
    Log in with username 'hacluster', password 'linux'
WARNING: You should change the hacluster password to something more secure!
  Enabling pacemaker.service
  Waiting for cluster........done
  Loading initial configuration

Configure Administration IP Address:
  Optionally configure an administration virtual IP
  address. The purpose of this IP address is to
  provide a single IP that can be used to interact
  with the cluster, rather than using the IP address
  of any specific cluster node.

  Do you wish to configure an administration IP? [y/N] N
  Done (log saved to /var/log/ha-cluster-bootstrap.log)
[2] 向群集添加节点
nfs02:~ # sudo ha-cluster-join
WARNING: NTP is not configured to start at system boot.
  Do you want to continue anyway? [y/N] Y

Join This Node to Cluster:
  You will be asked for the IP address of an existing node, from which
  configuration will be copied.  If you have not already configured
  passwordless ssh between nodes, you will be prompted for the root
  password of the existing node.

  IP address or hostname of existing node (e.g.: 192.168.1.1) [] 192.168.1.10
  Enabling sshd.service
  Retrieving SSH keys from 192.168.1.10
  /root/.ssh/id_rsa already exists - overwrite? [y/N] N
  No new SSH keys installed
  Configuring csync2
  Enabling csync2.socket
  Merging known_hosts
WARNING: known_hosts collection may be incomplete
WARNING: known_hosts merge may be incomplete
  Probing for new partitions......done
  Enabling hawk.service
    HA Web Konsole is now running, to see cluster status go to:
      https://192.168.1.20:7630/
    Log in with username 'hacluster', password 'linux'
WARNING: You should change the hacluster password to something more secure!
  Enabling pacemaker.service
  Waiting for cluster........done
  Done (log saved to /var/log/ha-cluster-bootstrap.log)
nfs02:~ #
[A] 将 hacluster 密码更改为相同的密码
nfs01:~ # sudo passwd hacluster
New password:
Retype new password:
passwd: password updated successfully
[A] 将 corosync 配置为使用其他传输,并添加 nodelist。
nfs01:~ # sudo vi /etc/corosync/corosync.conf

	interface {
                ringnumber:     0
                bindnetaddr:    192.168.1.0
                mcastaddr:      239.196.38.197
                mcastport:      5405
                ttl:            1
        }
        transport:      udpu
}

nodelist {
  node {
   # IP address of nfs01
   ring0_addr:192.168.1.10
  }
  node {
   # IP address of nfs02
   ring0_addr:192.168.1.20
  }
}

logging {


nfs01:~ # sudo service corosync restart
DRBD配置
[A] 安装 drbd 组件
nfs01:~ # sudo zypper install drbd drbd-kmp-default drbd-utils
Refreshing service 'Public_Cloud_Module_12_x86_64'.
Refreshing service 'SUSE_Linux_Enterprise_Server_for_SAP_Applications_12_SP2_x86_64'.
Loading repository data...
Reading installed packages...
'drbd' is already installed.
No update candidate for 'drbd-9.0.8+git.c8bc3670-10.8.1.x86_64'. The highest available version is already installed.
'drbd-utils' is already installed.
No update candidate for 'drbd-utils-9.0.0-8.15.1.x86_64'. The highest available version is already installed.
'drbd-kmp-default' is already installed.
No update candidate for 'drbd-kmp-default-9.0.8+git.c8bc3670_k4.4.114_92.67-10.8.1.x86_64'. The highest available version is already installed.
Resolving package dependencies...

Nothing to do.
[A] 为 drbd 设备创建分区
nfs01:~ # sudo sh -c 'echo -e "n\n\n\n\n\nw\n" | fdisk /dev/sdc'

Welcome to fdisk (util-linux 2.28).
Changes will remain in memory only, until you decide to write them.
Be careful before using the write command.

Device does not contain a recognized partition table.
Created a new DOS disklabel with disk identifier 0x2d41462f.

Command (m for help): Partition type
   p   primary (0 primary, 0 extended, 4 free)
   e   extended (container for logical partitions)
Select (default p):
Using default response p.
Partition number (1-4, default 1): First sector (2048-104857599, default 2048): Last sector, +sectors or +size{K,M,G,T,P} (2048-104857599, default 104857599):
Created a new partition 1 of type 'Linux' and of size 50 GiB.

Command (m for help): The partition table has been altered.
Calling ioctl() to re-read partition table.
Syncing disks.
[A] 创建 LVM 配置
nfs01:~ # sudo pvcreate /dev/sdc1
 Physical volume "/dev/sdc1" successfully created
nfs01:~ # sudo vgcreate vg_NFS /dev/sdc1
 Volume group "vg_NFS" successfully created
nfs01:~ # sudo lvcreate -l 100%FREE -n NWS vg_NFS
 Logical volume "NWS" created.
[A] 创建 NFS drbd 设备
为新的 drbd 设备插入配置并退出
nfs01:~ # sudo vi /etc/drbd.d/NWS_nfs.res

resource NWS_nfs {
   protocol     C;
   disk {
      on-io-error       pass_on;
   }
   on nfs01 {
      address   192.168.1.10:7790;
      device    /dev/drbd0;
      disk      /dev/vg_NFS/NWS;
      meta-disk internal;
   }
   on nfs02 {
      address   192.168.1.20:7790;
      device    /dev/drbd0;
      disk      /dev/vg_NFS/NWS;
      meta-disk internal;
   }
}
创建 drbd 设备并启动
nfs01:~ # sudo drbdadm create-md NWS_nfs

  --==  Thank you for participating in the global usage survey  ==--
The server's response is:

you are the 12773th user to install this version
initializing activity log
initializing bitmap (1600 KB) to all zero
Writing meta data...
New drbd meta data block successfully created.
success

nfs01:~ # sudo drbdadm up NWS_nfs
  --==  Thank you for participating in the global usage survey  ==--
The server's response is:

you are the 883th user to install this version
[1] 跳过初始同步
nfs01:~ # sudo drbdadm new-current-uuid --clear-bitmap NWS_nfs
nfs01:~ #
[1] 设置主节点
nfs01:~ # sudo drbdadm primary --force NWS_nfs
[1] 等待新的 drbd 设备完成同步
nfs01:~ # drbd-overview
 0:NWS_nfs/0 Connected(2*) Primar/Second UpToDa/UpToDa
[1] 在 drbd 设备上创建文件系统
nfs01:~ # sudo mkfs.xfs /dev/drbd0
meta-data=/dev/drbd0             isize=256    agcount=4, agsize=3276442 blks
         =                       sectsz=512   attr=2, projid32bit=1
         =                       crc=0        finobt=0, sparse=0
data     =                       bsize=4096   blocks=13105767, imaxpct=25
         =                       sunit=0      swidth=0 blks
naming   =version 2              bsize=4096   ascii-ci=0 ftype=1
log      =internal log           bsize=4096   blocks=6399, version=2
         =                       sectsz=512   sunit=0 blks, lazy-count=1
realtime =none                   extsz=4096   blocks=0, rtextents=0
配置集群框架
[1] 更改默认设置
nfs01:~ # sudo crm configure
crm(live)configure# rsc_defaults resource-stickiness="1"
crm(live)configure# commit
crm(live)configure# exit
bye
[1] 将 NFS drbd 设备添加到群集配置
nfs01:~ # sudo crm configure
crm(live)configure# primitive drbd_NWS_nfs \
      ocf:linbit:drbd \
      params drbd_resource="NWS_nfs" \
      op monitor interval="15" role="Master" \
      op monitor interval="30" role="Slave"
crm(live)configure# ms ms-drbd_NWS_nfs drbd_NWS_nfs \
      meta master-max="1" master-node-max="1" clone-max="2" \
      clone-node-max="1" notify="true" interleave="true"
crm(live)configure# commit
crm(live)configure# exit
bye
[1] 创建 NFS 服务器
nfs01:~ # sudo crm configure
crm(live)configure# primitive nfsserver \
      systemd:nfs-server \
      op monitor interval="30s"
crm(live)configure#
crm(live)configure# clone cl-nfsserver nfsserver interleave="true"
crm(live)configure# commit
crm(live)configure# exit
bye
nfs01:~ #
[1] 创建 NFS 文件系统资源
nfs01:~ # sudo crm configure
crm(live)configure# primitive fs_NWS_sapmnt \
      ocf:heartbeat:Filesystem \
      params device=/dev/drbd0 \
      directory=/srv/nfs/NWS  \
      fstype=xfs \
      op monitor interval="10s"
crm(live)configure#  group g-NWS_nfs fs_NWS_sapmnt
crm(live)configure# order o-NWS_drbd_before_nfs inf: \
      ms-drbd_NWS_nfs:promote g-NWS_nfs:start
crm(live)configure# colocation col-NWS_nfs_on_drbd inf: \
      g-NWS_nfs ms-drbd_NWS_nfs:Master
crm(live)configure# commit
crm(live)configure# exit
bye
[1] 创建 NFS 导出
nfs01:~ # sudo mkdir /srv/nfs/NWS/sidsys
nfs01:~ # sudo mkdir /srv/nfs/NWS/sapmntsid
nfs01:~ # sudo mkdir /srv/nfs/NWS/trans
nfs01:~ # sudo crm configure
crm(live)configure# primitive exportfs_NWS \
      ocf:heartbeat:exportfs \
      params directory="/srv/nfs/NWS" \
      options="rw,no_root_squash" \
      clientspec="*" fsid=0 \
      wait_for_leasetime_on_stop=true \
      op monitor interval="30s"
crm(live)configure# modgroup g-NWS_nfs add exportfs_NWS
crm(live)configure# commit
crm(live)configure# exit
bye
[1] 为内部负载均衡器创建一个虚拟 IP 资源和运行状况探测
nfs01:~ # sudo crm configure
crm(live)configure# primitive vip_NWS_nfs IPaddr2 \
 params ip=192.168.1.4 cidr_netmask=24 \
 op monitor interval=10 timeout=20
crm(live)configure# primitive nc_NWS_nfs anything \
 params binfile="/usr/bin/nc" cmdline_options="-l -k 61000" \
 op monitor timeout=20s interval=10 depth=0
crm(live)configure# modgroup g-NWS_nfs add nc_NWS_nfs
crm(live)configure# modgroup g-NWS_nfs add vip_NWS_nfs
crm(live)configure# commit
创建STONITH设备
创建一个Azure Active Directory 应用
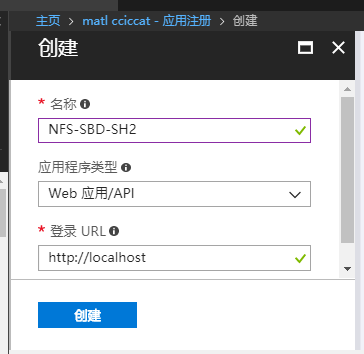
请在创建的过程中记录以下四个参数的值,后面会用到:
|
Subscription Id |
订阅Id |
|
Tenant id |
租户Id |
|
Application Id |
应用Id |
|
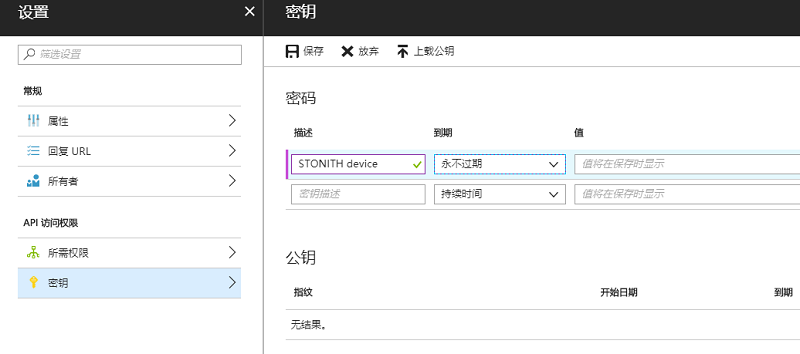
Auth Key |
授权秘钥 |
为Fence代理创建自定义角色
在最早的配置NFS的微软在线文档中,直接使用所有者角色进行授权,2018年3月份的文档更新以后,使用自定义角色进行授权。自定义角色中,只定义一个开机和关机权限,这样更安全。
创建自定义角色,我使用的是PowerShell,这个是在本地的Windows机器中完成的:
创建自定义角色定义文件
PowerShell打开文本编辑器,
PS> notepad customrole.json
输入:
{
  "Name": "SBD-LinuxFenceAgentRole",
  "Id": null,
  "IsCustom": true,
  "Description": "Allows to deallocate and start virtual machines",
  "Actions": [
    "Microsoft.Compute/*/read",
    "Microsoft.Compute/virtualMachines/deallocate/action",
    "Microsoft.Compute/virtualMachines/start/action"
  ],
  "NotActions": [
  ],
  "AssignableScopes": [
    "/subscriptions/你的订阅Id"
  ]
}
登陆Azure账号
PS> Login-AzureRmAccount -EnvironmentName AzureChinaCloud
选择订阅
Set-AzureRmContext -SubscriptionId 你的订阅Id
创建角色
PS> New-AzureRmRoleDefinition -InputFile .\customrole.json


Name             : SBD-LinuxFenceAgentRole
Id               : xxxx-xxxxx-xxxx
IsCustom         : True
Description      : Allows to deallocate and start virtual machines
Actions          : {Microsoft.Compute/*/read, Microsoft.Compute/virtualMachines/deallocate/action,
                   Microsoft.Compute/virtualMachines/start/action}
NotActions       : {}
AssignableScopes : {/subscriptions/你的订阅Id}
将自定义角色加入到机器的访问控制列表中

创建STONITH 设备
nfs01:~ # sudo crm configure property stonith-timeout=900
nfs01:~ # sudo crm configure primitive rsc_st_azure stonith:fence_azure_arm \
   params subscriptionId="你的订阅Id" resourceGroup="SBD-NFS-SH2" tenantId="你的租户Id" login="AAD 应用Id" passwd="授权秘钥"
为SBD Fencing创建fence拓扑
nfs01:~ # sudo crm configure fencing_topology \
   stonith-sbd rsc_st_azure
启用STONITH设备
nfs01:~ # sudo crm configure property stonith-enabled=true
故障转移验证
fence测试
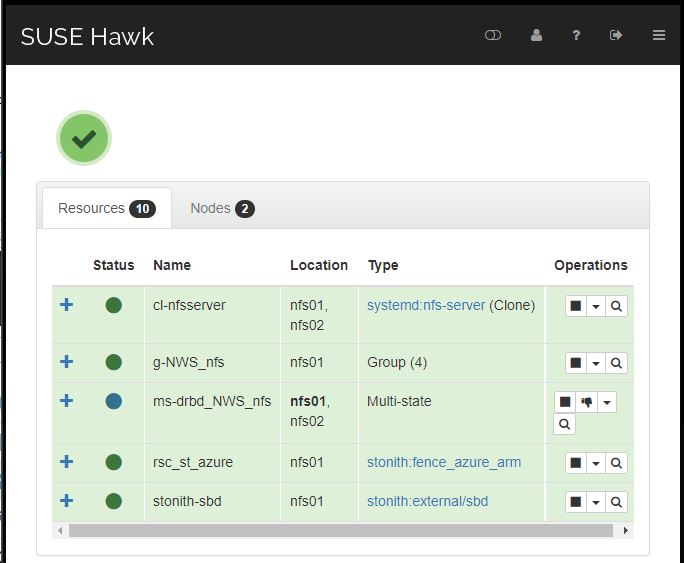
NFS集群配置结束以后,在机器控制台上,我们可以看到NFS工作nfs01上:
然后我们在nfs01上,禁用网卡:
nfs01:~ # sudo ifdown eth0
这样就会导致nfs01进入失联状态,期望集群能把nfs01拉出,工作流转移到nfs02上:
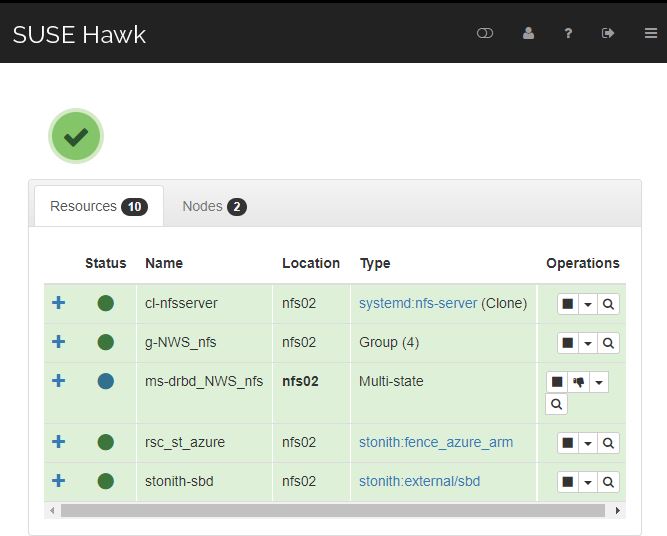
实际结果和期望结果一致,而且故障转移时间再1分钟以内。
请尊重原作者和编辑的辛勤劳动,欢迎转载,并注明出处!